There’s More to Life than Sports – Video Project

My Video

Topic

The topic I chose focuses on the benefits of watching sports as a family. Coming from a very sports-invested family, I can understand how we’ve been brought closer because of this. Although I don’t really enjoy sports themselves, my family gathers together every Sunday to watch football, thus ensuring that we have bonding time, despite not all living in the same house. Two sources I used to gather information are Meaningfulness of Watching Sports as a Family and Benefits of Watching Sports with Family.

Process

I used my IPhone to record all of the scenes, as well as a stabilizer for some of the shots. In order to edit the video, I used IMovie, as it was the most accessible to me and I have used it previously. I uploaded my video to YouTube, as it was the site I was most familiar with.

Credits and Attribution

Video created and edited by Alexa Kincaid via IMovie.

‘Actors’ shown: Alexa Kincaid, Andrew Kincaid, Aaron Kincaid, & Violet Kincaid.

Title and credit graphics created by Alexa Kincaid via Canva.

Sport fans packing a stadium for a game of football is from Anthony Z. Royster. Downloaded via Pexels.

A man holding a clipboard is from Cottonbro Studios. Downloaded via Pexels.

Group of boys plays soccer in a soccer field is from Kelly. Downloaded via Pexels.

Images are from Washington Commanders versus Tampa Bay Buccaneers game, November 14, 2021. Taken by Alexa Kincaid.

Podcast created and edited by Alexa Kincaid.

Intro is by INPLUSMUSIC. Downloaded via Envato.

Family Group Joke Laughter is by FxProSound. Downloaded via Envato.

Commentary is by Joe Davis from Dodgers versus Mets game, October 16, 2024.

Crowd Noise is from Dodgers versus Mets game, October 16, 2024.

UNDER CONSTRUCTION: Please Stand by…

Introduction: Briefly introduce the concept of hope and why it’s vital for personal growth and mental health.

Personal Story: Share your own experiences, focusing on moments where hope played a key role in overcoming challenges.

Research Back-Up: Cite studies from reputable sources like Harvard Medical School, highlighting the link between hope and mental health.

Practical Tips: Offer actionable advice on how to cultivate hope in daily life.

Conclusion: Wrap up with a powerful message about the transformative power of hope. Visually, you can incorporate serene sunrise scenes, clips of personal milestones, and snippets of the research you cite. This approach will make your content both engaging and informative. Ready to get started?

Project 8.6 Video Check Point

The Title and Script

I am using the title I used for the audio about resolving family conflict. Because I am using video clips with my video recordings, I modified the script to match the script.

Video Lists

It is difficult to get real family in conflict to record, so I will modify video clips to care of that challenge. Attached is the lists

Recording

I modified the video clips and recorded the scripts according to the video lists. I used Canva instead of Clipchamp because it is easier to record the video with the script and voiceover for the clips and graphics.

Visual Materials

I modified graphics images and videos form Canva for the recording.

Writer’s Choice Checkpoint

Shot List

What I Plan to Record

I decided to do my project on a writer’s choice. There are different tools that a writer can choose, and I go through the three that I would select between. In the beginning, there were quills, a feather that was dipped into ink and then used to write on paper. Now we have pencils, mechanical pencils, fountain pens, ball point pens, and the list goes on.

As a writer, I like having choices, but I also have a go-to tool that I use when notetaking. This is to show what I feel is the easiest and most versatile for notetaking (without involving modern technology to take the notes). I choose between a pen, a mechanical pencil, and a regular, old-fashioned pencil.

Equipment

The Following are the tools that I will use to shoot my video:

  • Video Camera
  • Tripod
  • Gimbal
  • A No.2 Pencil
  • A Mechanical Pencil
  • A Pen
  • Three Sheets of Notebook paper

It is easy to see why I need the camera, because I cannot record without it. I have a tripod to that I can record a couple of steady shots for the project. The gimbal is used to capture another steady shot while I pan across the paper, without having to remain stationary. And then the paper and writing tools are going to be used as the subjects in the frame.

Video Outline- Heavy is the Hand that Holds the Spoon

Shot List

List of types of shots intended to be used in the Video Project

Test Recording

Transcript

“Hi! My name is Meaghan Van Dyke and this is the test recording for the Digital Studies podcast into video project. For dinner tonight, I had McDonald’s.”

Equipment

To record this test recording, I used a makeshift stabilizer that I will use for the cooking shots in the video in order to get the most scope of the stove during the cooking scenes. For the other shots, I plan to use a tripod stabilizer. Since a majority of the shots will be filmed in the kitchen, I decided to use the natural kitchen lighting to create a more realistic kitchen environment for viewers.

Recording Information

For this project, I plan to use graphics for the title card and the closing shot to establish the podcast and its content. The two close ups I’ve planned for this project, the close up of the Eagle Landing doors and the food cooking on the stove, are used to establish the details of the setting and additional sensory details of the meal. The only planned medium shot of the video, Riley cooking at the stove, establishes Riley the detail of the cooking process and the setting of the kitchen itself. The several establishing wide shots, such as the shots of Eagle Landing and Riley cooking in the kitchen, establish a greater understanding of setting, which plays a significant role in the main focus of the podcast, college apartment cooking itself.

Video Project Checkpoint

Shot List

Instructions

My plan for my project is to create a reaction video of my friend and I reacting to some of the dances from Disney week of Dancing with the Stars. I will include recorded video of our faces, and images of the dancers to show up on camera for a mix of still images.

List

    Shot List: DWTS Reaction Video

    1. Intro Shots
      • Wide Shot: You and your friend sitting on a couch, with a TV or screen in the background (or just looking at the camera if you’re watching on a laptop).
      • Close-Up: Each of you introducing yourselves and what you’ll be reacting to.
    2. Setup Shots
      • Medium Shot: Both of you setting up, holding remotes, or playing the video on the screen.
      • Over-the-Shoulder Shot: Screen displaying the “Dancing with the Stars” logo or intro of the dance clip.
    3. Reaction Shots
      • Split-Screen Close-Ups: Individual reactions from each of you as the dance begins.
      • Wide Shot: Both of you watching the screen, reacting simultaneously.
      • Over-the-Shoulder Shot: View of the dance on the screen, showing a bit of your heads from behind, emphasizing you watching it.
      • Cutaway Close-Ups: Quick close-up shots focusing on facial expressions during surprising, funny, or impressive moments.
      • Medium Shot: Both of you occasionally pausing the video to discuss or make a comment.
    4. Commentary & Discussion Shots
      • Medium Two-Shot: Both of you talking about the dance after it finishes.
      • Close-Up: Solo shots of each of you giving your thoughts on specific moves or overall performance.
      • Over-the-Shoulder Shot: One of you pointing out something on the screen while the other reacts.
    5. Reaction Highlights
      • Close-Up (Slow Motion): Emphasize exaggerated or funny reactions in slow-motion (e.g., jaw drop, shocked expressions).
      • Medium Two-Shot: Both of you laughing, surprised, or high-fiving during a great moment.
    6. Cutaways & B-Roll
      • Close-Up of Hands: One of you grabbing popcorn, drinks, or snacks while watching.
      • Wide Shot: Establishing shots of the room or setup at different points, such as before you start and in between dance clips.
    7. Outro Shots
      • Medium Two-Shot: Recap your favorite moments and thank the viewers.
      • Wide Shot: Both of you waving goodbye or signing off.
      • Close-Up: Each of you teasing the next episode or reaction video if it’s a series.
    8. Additional Angles & Reactions
      • Alternate Angles: Change up your setup slightly for different dances so there’s more visual variety.
      • Reaction Inserts: Quick cuts to past reactions if you want to reference them or create running jokes.

    Test Recordings

    Equipment

    I plan to use an Iphone to record, and materials around the room for a stabilizer. We will also have a person to film the scenes where the camera is moving. I chose this to keep the video simple. I will use Imovie to put it all together and edit. There will be a clip of the dances we watch in the bottom corner so the audience can see a clear view as to what we are looking at.

    My Plan

    I plan to shoot similar angles as to what we just tested. As we will have close ups of our reactions, and wide angles looking at the scenery in the background to get a sense of comfort. We will react to some of our favorite dances from one of the weeks. This supports my project as I discussed what Dancing with the Stars was about, and I gave a blurb about the upcoming episode, and now we will be reacting to that episode.

    Project 8 Checkpoint: Planning & Filming

    My Project Shot List, and Why I Chose It 

    My Well-Schemed Plan to Make my Audio Project Come to Life! 

    For this project, I did things a bit backwards. To explain, the event I was covering for the podcast took place on Friday, October 18th. Therefore, I had a bit of a stricter time frame to work with. Luckily, my professor was kind enough to give details about project 8 ahead of time, so I could make sure I captured everything needed. Therefore, I had covered this event with my list last week – thus why most of the columns on the side of my list are marked “TRUE” instead of “FALSE”. So, for my shot list, I planned several recordings of various scenes such as the event environment, staff working, vendors and the people who partake in the event! Specifically covering the topics that were talked about during the interview I conducted. This way, the video being shown would have correlation to what was being said by the interviewee. I had also planned on taking several pictures that will be used supplementary as well – providing a good mixture of the two visual elements. 

    My Test Recording & Equipment

    A Video of my Recording Conditions with The Equipment I used! 

    Video by Summer Koontz from dgst101.summersthoughts.com

    As far as capturing the visual elements of my project, I used my Iphone 12 to record the video, a Nikon D3500 to take pictures, as well as a hand-held tripod to attach to my phone for videos. I chose these specific tools because they were the most convenient items to carry around and easily capture videos and photos during a hectic event. Because my hands were rather full carrying around a camera, phone and tripod during the event – I unfortunately didn’t use much equipment in the way of lighting. However, for the majority of the event, natural sunlight that was captured in the recordings were perfect. To help make the recordings better quality, I manually switched some of the camera settings around on my Iphone as well as turning the exposure up or down on my phone during recordings to get the right kind of lighting I wanted.

    This specific test video resembles the same conditions of the visual elements I captured – as they were all taken outside and (with the exception of two clips) during the day with natural sunlight. Additionally, this was taken with my handheld tripod that I used for the majority of my videos during the event as well.

    Checkpoint Assignment: Video Shotlist & Test Recording

    Why I chose my images

    Although I live in a “sma ll town” the number of homeless or “unsheltered” individuals would probably surprise you. I have chosed to shoot some of the most popular “hang out” spots, a “tent city”, and one of our most popular locals who directs traffic for tips.

    Equiptment Used

    I am choosing to use my iPhone 13 ProMax. It has excellent recording ability for both audio and video. It is easy to find attachments to secure it to a tripod. For the topic I have chosed this is the most discret and unformitable device that I could chose.

    Shot List

    list of video locations and shots selected

    Video

    Video Shot List: “Liv’s College Diaries”

    Equipment

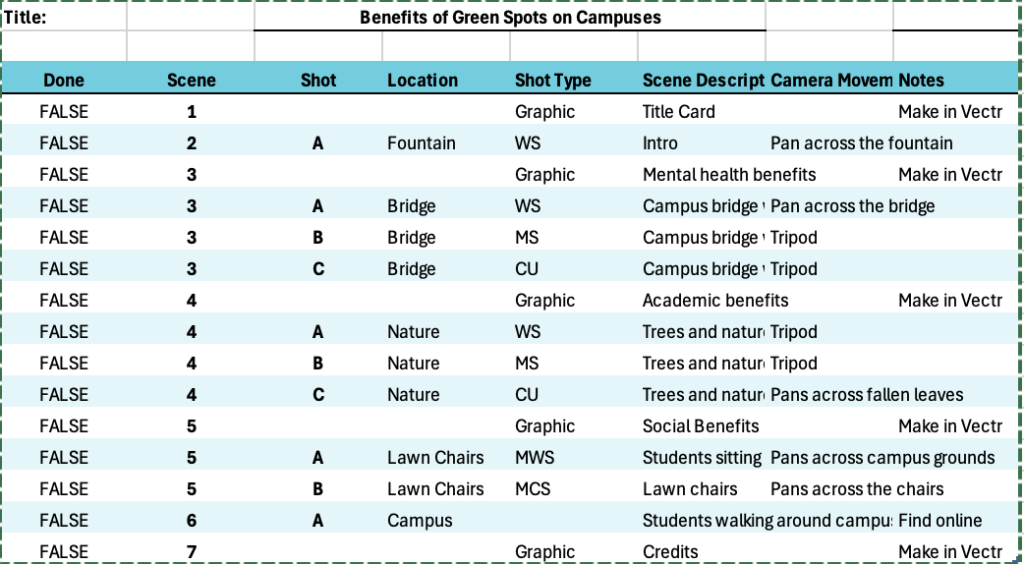
    For the video’s that I have to take for this project, I plan to use my phone in order to capture the various videos. I chose this because my phone makes it easier to transfer any videos or audios that I need for the project to my MacBook. I will also use a tripod in order to take more stable videos and shots. With any graphics that I create, I will use Vectr to create the graphics in order to create a coherent atmosphere that goes along with the video. Lastly, any extra images or videos that I find online will be through Pixabay.com.

    Visual Material

    Throughout this project, I want to use the campus of University of Mary Washington as inspiration for the project. My project is about the benefits of green spots on campus, so I will find the most popular spots, or spots that I personally like, in order to emphasize the main idea of my project. Specifically, I will use shots of the Monroe Fountain, the bridge between the fountain and Seacobeck Hall, and the multiple sitting areas around campus. Additionally, I will use various shots of the trees around campus, which will be especially pretty since the leaves are falling and the colors are changing. All of these areas encourage students to spend more time outside, and it will go perfectly with the topic of my project.

    css.php